Saturday 30 August 2014

Something Fishy's Going On

I found these little fishes in a charity shop.  They were a horrible orange and and yellow colour, but I liked their shapes.


I painted them using an Ranger adirondack paint dabber in a colour called 'Stream', though I don't know why it has that name as it isn't remotely stream coloured. :-/

I then painted the lower half of each fish with Salty Ocean distress paint dauber.  I forgot to take a picture of that stage though, so just take my word for that. It's so easy to get totally absorbed in the work and it's easy to forget to record the different stages!

I've had some little Cosmic Shimmer iridescent watercolour paint pots for ages, but hadn't found a project to use them on. They were perfect for painting fishscales and the tails anf fins.  Here's the finished fish.

I'll have to change the position of the hanging hook on the lower fish.  I decided to paint him facing in the other direction to his twin.


I was really pleased with the look of the scales.  

Saturday 9 August 2014

Tim's Tag and My New Art Journal (or at least the cover of it)

 Here's My take on Tim's August Tag.  Strange that it was using a rusty technique on the corners, considering the photo album I've just completed.  I used a Crafty Individuals stamp that was given to me by my crafty friend Zuzu. I'm not really in to stamping, so don't have that many and this was the only one I had of a head. Or two heads in this case.  


I used distress stains in peacock feather, vintage photo, bundled sage and weathered wood, though the sage colour has pretty well disappeared. I used a tiny attacher to attach some of the elements as I haven't got a sewing machine handy (attic? back of cupboard under a pile of junk?), and not enough patience to do that by hand. I made a big fluffy bow using the 3 times around the fingers technique.  I think if I was doing this one again I would use embossing powder on the stamp as it doesn't stand out enough and that area of the tag needs a bit of texture.

My other project that I finished recently was an art journal cover. I was supposed to be going over to Zuzu's house on Thursday and she had decided that we would be creating a journal page, and I've not done that before.  As it turned out the date was cancelled, but I did the cover of my new journal instead.  I bought a ringbound book of multimedia paper to use as a journal, but the cover needed strengthening.  I covered the front in patches of embossed foil, using all my favourite embossing folders, and a couple of Movers and Shapers die cuts that were hanging about in a drawer.  I added some stiff card to the reverse side.  I painted over the foil with white gesso and let this dry then dribbled alcohol inks in several colours over it.  Once dry I sanded back the relief areas to reveal the foil.  I hope it stands up to some wear and tear.


I hope I can create interesting pages inside.  It's a big book (A4) with lots of pages and a bit intimidating.  Eek.

Friday 8 August 2014

A Bit Rusty. Must be all that rain.

 So, the holiday on Loch Awe was a wash out, so much so that we came home a day early.  But the place we were in was lovely, the view over to Ben Cruachan was quite stunning, and we did get one day of sun before rain ruined it all.  I got one decent picture from the loch side showing the view from our lodge.


Back to my crafting room.  Don't care if it rains when I'm there.

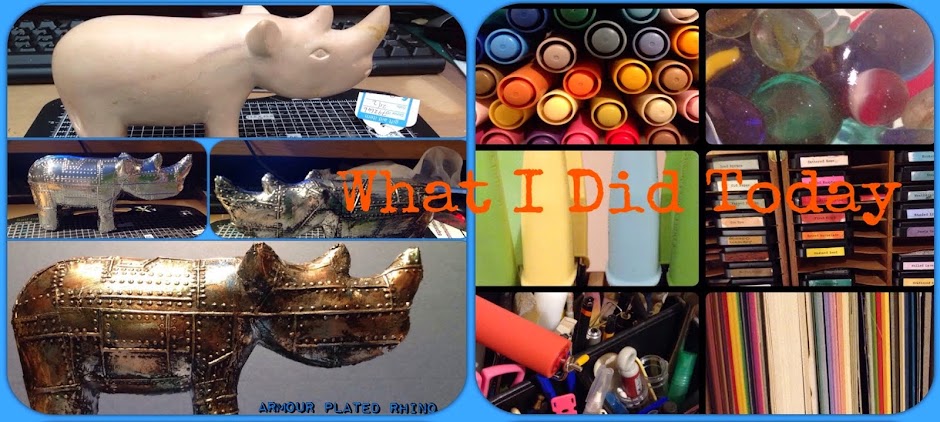
I was given a large John Lewis photo album by someone, with the request that I make it look 'like something from Mad Max, because I know you can do that sort of thing'.  Gulp. Can I?  I do vaguely remember seeing the film about 20 years ago, but I don't remember the details.  Apparently the Mad Max look involves a lot of rust, found objects, buckles and chains, so I  have been working on that for the last few days.  I wasn't sure about how to go about making something look rusty so I experimented with different paint finishes.  The first was okay, but wasn't quite right as the colour was wrong and it ended up too smooth and shiny because I mod podged it at the end. Matt finish mod podge isn't matt enough!


So I took a different tack and this worked well. 


For this one I painted a piece of white foam board with Ranger black gesso and then painted over that with a coat of Americana acrylic paint in Bitter Chocolate. I then used Ranger's clear embossing dabber around the edges of the piece (I love this dabber, so much easier than using an ink pad) and then covered that with Tim Holtz Vintage Photo distress embossing powder.  That  gives just the right kind of 'grittiness'. I treated the die cut cogs in the same way.  The colour overall was a bit flat so I gave a light random sploding of very, very watered down orange paint, just what I had on the shelf which in this case was Decoart Traditions Quinacridone Burnt Orange, and Crafters acrylic Pure Pumpkin. 

Finally, to add a little contrast to the patina, I shook up a bottle of Tattered Angels glimmer mist in Midnight Blue and then dipped a paintbrush in the bubbles and dabbed very sparingly on a few areas.  This gave a slightly metallic blue sheen which brought the whole thing alive.  However, it's a good idea to check that the top is screwed up tight before shaking the bottle.  I didn't, and I've still got blue hands 2 days later!

The banner is one of those lasercut wooden ones that came from Hobbycraft (I think) and I simply coloured it with Smooch blue pearlised accent paint. The female body is one I made from fimo clay.

After the experimenting came the real thing, so here are the pics of various stages of the make, using the same techniques as above.  I sealed up the inside pages in a poly bag and masking tape so I wouldn't get them messed up.  I used white foam board again for the title piece, to give a bit of depth.  The spine is swiped over in Vintage Photo distress stain.


There are a whole host of different found objects, many from my drawerfull of loose junk so I'm not sure what they all are, but everything was altered to give it the rusty look, apart from one or two of the Prima Junkyard Findings, and the Tim Holtz buckles, cogs, philosophy tag and foliage piece.  I liked the way the copper shone against the rust, so I mixed up some Ruby and Renaissance Treasure Gold waxes to make a coppery colour and used a tiny bit of it to highlight the lettering (Tim's Alpha Parts, with a coat of paint to take the shine off).   I made the bands to go through the buckles out of suede cut from a charity shop handbag. I had tried to make some from grungeboard but they cracked, and then from black gaffer tape, but that was too shiny and stiff.  The suede has the advantage of being supple and strong and so much easier to get through the buckle.

On to new things tomorrow.  Haven't done Tim's tag for August yet, so will have a look at that,


Tuesday 22 July 2014

Tim's July Tag, and appropriately summer comes to Scotland. That doesn't happen as regularly as one might expect.


We are about to go on holiday, which will involve a commune with the midges for a week on the banks of Loch Awe.  We needed somewhere that would take a large arthritic Labrador, for such is Rolo.  He's too old to go in kennels, so need to take him with us. But he loves a swim, and we like to try and catch fish, so hopefully this will be the ideal spot. I have bought a couple of bottles of the SAS approved midge repellant that is also known as Avon's Skin So Soft. Hope it works.  And I'm so HAPPY that the weather looks like it is going to be lovely and warm.  That makes such a difference on a staycation.

 So a quick post of this tag, and then I'm away to start my packing.  I liked the sea theme, and copied this almost exactly, except that I had to draw and cut out the seahorse and twiggy piece freehand as I didn't have the dies. I've also swapped the sand dollar for a scallop shell as we don't get sand dollars here in Scotland.  I've never seen one anyway.  Plenty of scallops though.  Yum. I cut this from card stock and used an embossing tool to get the curves in the shell.  Loved the sand effect too!  I will be using that technique again.  I also used a dried starfish that I had in my stash, and hope that this isn't environmentally unsound. Sorry.


That's it for now.  I'll take a wee box of watercolours on holiday in case the view inspires.

Friday 23 May 2014

I lose my iPhone, bank card, way home and possibly marbles. And join a Beer Mat Swap.

Zuzu and I tried to jazz up my blog, but we couldn't get the links to work. So it's still just plain boring!
We had a good day together at my house on Wednesday, but I got in something of a tizz, lost my bank card, which I found again 5 minutes after reporting it lost to my bank, took the wrong turning on the road to my house (too busy talking to drive accurately) mislaid my iPhone, and generally had a dippy  brainless kind of day.   But it was fun all the same.

Zuzu organises challenges on her blog, and this month she has an altered beer mat swap going on, so I joined in for the first time.  I handed in my 5 efforts today, and can't wait to see what comes to me.

Here are mine, which are themed on the poetry of Masefield and Wordsworth, the writings of HG Wells, the Romance of Paris and the films of Alfred Hitchcock.

The first one is based on two poems by John Masefield 'Sea Fever' and 'Cargoes'


This one is based on Wordsworth's 'Upon Westminster Bridge'.  I learned this poem off by heart at the age of 10, for a school concert, and it has stuck with me ever since (47years!).  I do like the imagery in that poem. I also attached a daffodil to this mat, for obvious reasons.


This one is Wells' 'The Time Machine' and 'The Invisible Man'. I used some plastic molding film to make the invisible man, a bit hard to see in the photo.

Romantic Paris.  No particular reason for this other than I like these embossing folders!  In fact Paris is turning out to be a bit of a nightmare for my son's partner Jill who is on a two week educational placement there at the moment.  A group of students from Edinburgh College went over to Paris last Saturday, and all but Jill and one other girl came home after just a couple of days, due to the hassle they were getting from pickpockets and attempted muggings.  Jill is determined to stick it out though, and the college have moved them to another hotel in a better area.  I hope all goes well for her.


Alfred Hitchcock films 'North by North a West' and 'The Birds'.  There's also a bit of 'Torn Curtain' in the dangly, but that might be a bit too subtle for most.


So, that's my swap.  These mats are quite addictive though.  I did another couple just for me.

Wednesday 21 May 2014

A Graphic 45 ABC Primer Album


Today, Zuzu is helping me make my blog more interesting.  Here is a  video I posted on YouTube a couple of years ago.  Must get around to making another sometime soon....

Sunday 4 May 2014

May Day May Tag


It's the holiday weekend, and of course it is raining.  We were intendingto go to Dobbies for bedding plants and stuff for the hanging baskets, but the rain gave me an excuse to stay indoors and play about in my craft room.  I recently ordered some new dies and embossing folders from the fantastic Sizzix sale, which arrived on Friday, so I was dead keen to get in there and start messing with them.  Spent a while unwrapping and examining them all, as you do, and it was only when I started to do my May tag that I realised that one of the items I ordered is missing, so I will have to ring Sizzix and get that sorted.  I ordered the movers and shapers old jalopy and arrow, but it was not there and it would have been great on this tag - I was going to use the jalopy in place of the butterfly that Tim put on his, but never mind.
Tim's tag did not have a theme, but he made it with the advice to crafters to stop hoarding all our ideology charms and stuff, and actually get it out and use them in our projects.  LOL, that's me. Got a drawer full.

 Tim's May tag showcased ideology bits and pieces, so I had lots of those to choose from.  Anyway, I'd decided to make mine on a travel theme, old jalopy or no, so here it is:


I did not have the Shadowpress embossing folders that Tim used, but found that one of the Texture Fades embossing folders from a set called 'Travel Signs' ( one of the folders I had just received) had some partly debossed words in it, so I used the word TRAVEL from the embossing folder.  Using his ink technique, where you ink the actual folder before inserting the. paper and putting it through the embossing machine was a bit scary, but it worked a treat and the leftover ink did come off the plastic with a bit of buffing with a baby wipe, so that was alright.  The little train is made of wood and is from a set I got in Hobbycraft.  I inked it with felt pens and embossed it with several coats of embossing powder, including a dip into silver embossing powder at the end, to metallise the wheels.

The white bird in the frame at the top is cut for another texture fade embossing folder (called Patchwork) which i embossed on white card and Then gave 3 layers of clear embossing powder to turn it into a 'charm'.  The chipboard frame it is in was one I had In a drawer, out of the packet so no idea who makes it it was originally cream with blue glitter, but I gave it several coats of silver embossing and then pressed a paisley patterned rubber stamp into it before it cooled down.

All the other items are Tim Holtz, including the background papers which are a mixture of his Retro Grunge and Seasonal stashes.  

The only thing I would change would be to use thicker chipboard behing each item.  Mine is quite thin and it looks too much like I've just stuck bits of paper behind each piece. Tsk.


My other project today was another altered metal biscuit tin.  I got this one from a charity shop a couple of weeks ago, and after I took the sticky labels off I stuck some embossed metal tape on it, added a Tim Holtz drawer pull and a dymo label.  I then swiped it with DecoArts Traditions raw umber acrylic paint, rubbed some of that off before it was totally dry, then dabbed it with Ranger alcohol inks in Rust, Espresso, Bottle and Pool..  This is another box for husband who after having walked the dog, cooked the dinner, brought me sustenance and coffee throughout the day today, is now vacuuming the floors to make me feel guilty for having closeted myself away in my craft room.  Not working though, I'm still here, and I'm not moving.


I've been doing a lot with this metal tape recently.  Gone a little metal mental tbh.  Here are some more charity shop finds that I have 'improved'.  Or so I like to think!  

Cheery.


Saturday 5 April 2014

April Tag a la Tim


I have my craft room up and running at last.  But it's sooo organised that I can't find anything, but never mind, once I start getting messy in it then I'm sure things will find their own place in the natural disorder. It is just FAR too tidy at the moment!

Some pictures ( before chaos reigns)


Very happy bunny.

Here my take on Tim's April tag.  Haven't got a Frameworks die, everyone in UK seems to be out of stock of the dies I want ( honeycomb and trellis) so I tried to make my own using a wee movers and shapers stamp die.  Bit of a faff, and a bit squint, but it'll do.


Toodle pip.


Monday 10 February 2014

A Very Busy Day

I spent Saturday doing nothing but arty projects from the first thing in the morning to well into the evening.  I had an unexpected free day because I thought I had a friend coming for lunch but that isn't until next week, I found.  Crafty stuff was way better than watching both Scotland (where I live) and Wales (land of my birth) getting totally gubbed at the rugby.

Here's a round up of the day...
An ugly charity shop find was turned into a (relatively speaking) thing of beauty:

I used embossed metal tape, black acrylic paint and Ranger alcohol inks to get this effect.  The Embossing folders are from Tim Holtz Alterations Texture Fades by Sizzix (Diamond Plate & Rivited Metal Set and Blueprint and Gears Set).

Next was Tim Holtz February tag...


I didn't have most of the items he used, but that was okay as it makes for creativity. The 'chalked' area was made with American Crafts silver embossing powder.  This isn't very shiny, so was a pretty good substitute for chalk.  I used a random little red heart stamp and Tim's distress inks for the background, and embossed them with clear embossing powder from Papermania.  The red chipboard heart was coloured with clear distress stickles in clear rock candy coloured with a little alcohol ink.  I love that you can do that, and have any colour of glitter that you want!  I was happy with the overall result.

Next!

I had covered a box with embossed foil a couple of weeks ago (okay I'm obsessed with that at the mo) but I wasn't happy with it as it was looking far too shiny. So I gave it the rub on-rub off black paint treatment and then splodged it with alcohol ink to antique it.  Much better.


I also covered a little chest of drawers with the (Next) wallpaper we have just decorated the guest bedroom with. The handles are Tim Holtz curio knobs, just perfect for this.  This will hold some of the toiletries, soaps, shower caps and sewing kits I have hoarded from various hotel stays.  Who knows, they might all get used eventually. We just need some guests who forgot to pack there spongebags to come and stay for a month.

I love thie quote on the front (by Arrigo Boito apparently, not Shakespeare as often attributed).  It says 
'When I saw you I fell in love
and you smiled because you knew'

Sigh.


Saturday 1 February 2014

Better Late than Never

Okay, so it's 1 February, but I've only just managed to do the January tag from Tim's 12 tags of 2014. Better late than never, and delayed because I was waiting for the pocket watch die to arrive from Sizzix.   I bought a whole bunch of dies in the Sizzix sale  in January, and can't wait to use them all.

I've also been distracted by some lovely foil tape that I purchased from  a company called Tapes Direct.  This foil tape is a lot thicker than the regular stuff you can buy, and is fantastic for embossing with.  I used it to cover a little metal box to keep important receipts in, and a tiny little bird house.


Another project with the foil is a direct lift from YouTube, so thank you Linda Neff I love the look of this.  You can find the link to her video here http://youtu.be/B8hfwQmPGYI


I've been hoping to move all my craft stuff into the small spare bedroom but this involves moving the remaining son into the bedroom vacated by son 1 ( now left home) and buying 2 new beds, decorating the new guest bedroom vacated by son 2, getting rid of 3 old beds, and buying a new craft desk.  All this has fallen down because the beds that were due to arrive this week will not now be arriving until 5 March 'due to lack of stock'.  Thanks Homebase.

http://timholtz.com/category/12-tags-of-2014/