Thursday 26 December 2013

60th Birthday Boxes Book for Bill


It was my husband Bill's 60th birthday this month, so I made him this assembly in lieu of a birthday card.  It is made out of 2 Tando Creative mini printers trays with covers, stuck together to make a book.  The frames have been covered in silver embossing powder for a metallic finish, and each window is backed with Tim Holtz seasonal stash papers, though there may be an odd one with different paper. Many of the pieces are Tim's Ideaology pieces.

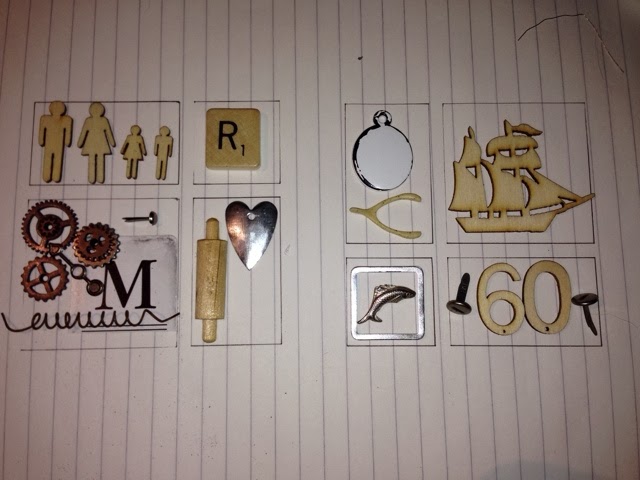
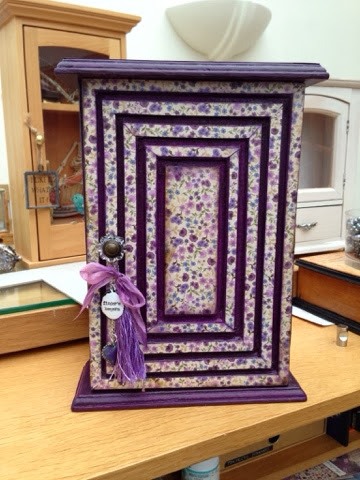
Each window represents some part of his life - hobbies, interests, work, play, family etc. and a private joke or two best left that way!

It took a long time to collect all the little bits to put in this.  I suppose his birthday has been at the back of my mind all year as quite a few of the pieces are from car boot trawls over the year.  I altered most of the pieces in some way, and made some up from Fimo.  I was particularly pleased with the altered plaster head Borg (he's a Star Trek fan) with fimo headdress and resistor.  Because resistance is futile...

Some of the references were a bit too subtle for him, so took some guesswork on his part and explanation from me.  Like the L, T ans S.  He couldn't place that, so had to explain that was the initials of me and our 2 boys! Jeez.

Anyway, he loved it, so that was good.


Thursday 7 November 2013

Birthday boxes

I bought a new cupboard from ikea to store some of my crafting items.  This resulted in a major tidy up of my craft area, and now I can't find stuff.  Pfft.

I have a couple of friends who have recently reached their 60th birthday milestone, so I made them each a little assemblage in lieu of a birthday card.  They use Tando Creative mini printer trays with covers. I LOVE working with these.  Half the fun is finding meaningful pieces to place in the windows.m

This one was for Cheryl.  This is using one mini tray with cover.


The one I made for Ron is actually two mini trays side by side, with the covers cut and pasted together to form a 'book'.


Most of the items have been altered in some way.  The fish charm was altered using alcohol ink pens, and the little plywood items coloured with acrylic paint and pens, then covered with Glossy Accents.  This is what things looked like in the planning stage :


I made a few additions to the plan, but this was a very helpful exercise.


Thursday 17 October 2013

On My Metal


I was given a lovely wooden wine box by a work colleague (much more highly paid than me obviously, as my wine tends to come in boxes made of cardboard and with a plastic tap) and it sat on my shelf for a while awaiting inspiration.  This came in the form of a Tim Holtz embossing folder, that produces a rivited metal effect.  I would also like to thank RachO113 for her YouTube video Metal Tape Art as I saw this and couldn't wait to get started on the the box.

The first thing I did was sand down and then paint the edges of the box with a couple of layers of silver acrylic paint.  I then cut panels of greyboard to fit each side of the box including the top and sides of the lid.  I could have worked directly on to the box surface, but found it easier to work on the smaller panels, and they also gave more 3d depth to the box once stuck on.


I used cheap silver plumber's tape from the DIY store over the panels that had various shapes, buttons, mesh, paper shapes, letters, screw-type brads (basically any item I could find in my stash that looked vaguely techno!) stuck on.  Some places needed a few layers as the tape sometimes split at the edge of raised parts.  Once the silver tape had been burnished on with an embossing tool I placed pieces of Ranger foil tape and used a ballpoint pen the mark the dot rivets.   I added some Tim Holtz box corners, gears, pull handle, clock face and game spinner to the top.  The small round studs alongside the base at the front and next to the gears on the lid are from 7gypsies.


Panels were stuck on with hot glue.

Husband commandeered it for his dressing table, so that was nice...


Monday 30 September 2013

Cupboard love.


It's absolutely ages since I blogged anything.  But I was quite pleased with this little project so thought I'd share.

A friend gave am a little key cupboard that she didn't like or want.  So I fixed it up and gave it back to her for her her birthday!  Cheapskate.  I THINK she was pleased :-o

The papers I used for this are from Maja Design of Sweden.  Lovely quality, double sided and so pretty.  I got them from my friends Janine's shop The Mad Scrapper - a mile down the road from me, but she also has an online shop.  Also used Claudine Hellmuth Studio gesso, DecoArt acrylic paints, Mod Podge, and Tim Holtz distress inks and stain, and also his embellishments - curio knob, heart charm, rubons, crinkle ribbon and enamel tags.  Love Tim's stuff...


Monday 15 July 2013

Political Saltire.

Goodness me, it is 2 months since I last posted. Where have I been?   On holiday, at work, or in the garden enjoying this fabulous weather is where.

I've have managed to do some craft stuff though. For starters I did a Scottish take on Tim Holtz's July tag:
Apart from Tim's ideas, the inspiration behind this was the upcoming Scottish Independence vote in 2014. I'm Welsh but have lived in Scotland for 44 years and currently live in East Lothian, the birth place of the Saltire (Scottish flag) in 832 AD.  I'm not sure If independence will be a good thing or not, and haven't decided which way to vote, hence the 'discretion advised' label.  The Nationalists have a lot of questions to answer if they want me to vote Yes, but I'm open to persuasion...
The flag is made from grunge paper, cut and coloured to look like it is folded - it was hard to get the diagonals right (and they aren't!). The flag pole is a stirrer from a well known coffee outlet and the 'tartan' ribbon is coloured with distress stain and distress marker pens.  Tim's lion rampant stamp is used a few stiles in the background along with some tape that I don't know the maker of.

Crafting with a political edge.  Wow.

Thursday 2 May 2013

May Tag Purple Haze

Gosh, where did April go..!?

I've been busy making a wedding cake for my sister in law who is getting married next week, so I've not been doing as much craft work. I've never done a wedding cake before, but she asked me to do it because she likes the Christmas cakes I make. But those are just single cakes, and now I'm making a 3 tier effort, with butterflies. A bit scary, but I find fear does concentrate the mind so I hope to do a decent job.

Here is the finished article.  It went down well, thank heavens.
I've also made some more Domino 'books', but more of those later because today is Tim Holtz Tag Day!

This months' tag incorporates rubons. Or is it rub-ons? Hmm. Whatever, I don't get on with these usually, I end up with broken transfers and random bits stuck where they shouldn't be stuck. But hey ho, I'll give it a go.

I did't have all the rubon images that Tim used but I did have some that I got for 70 pence in Txmaxx. Can't resist a bargain. But that was ages and ages ago and I couldn't think what to do with them. They have images of Edwardian men and vintage games which made me rethink the colour scheme that Tim uses. I love the bright colours he used but they weren't suitable for vintage images. I used a mix of chipped sapphire, seedless preserve and iced spruce which ended up a sort of purple haze. I love the contrast with the white of the rubon and the white enamel tag which i made from a numbered plaquettes, covered the number up with snowcap alcohol ink and then added rubon words. The background stamps are a mix of Paper Artsy and Tim's.


Monday 8 April 2013

Domino Duo

I've had a bit of a tidy up of my crafting area, so not much creating was done for a few days. But on Saturday OH and I went for a trawl of the charity shops in Stockbridge. I was hoping to find some dominoes and was lucky to find a tin of them for a couple of quid.

I'm indebted to a couple of you tube contributors for the idea for making these little 'domino books'. I will find the details and note them here, when I have access to my PC.

(YouTube contributors RachO113 and AKCaraboo I love your work, hope you don't mind me stealing your ideas!)

I think they will make nice gifts.


Wednesday 3 April 2013

Another go

I wasn't particularly happy with my take on Tim's April tag. I didn't have the right colours and thought it was a bit dull.

So today I went searching the craft shops in the Edinburgh environs and at the third attempt I founding that had some of the distress paints in stock. Stampers Grove is well stocked but a bugger to park near as it's in the middle of the city in a one way system! But the drive through the park was lovely as the view is stunning and the sun was shining for once.

Unfortunately I'd forgotten the list of colours, and was too stupid to remember I could have looked them up on my iPhone. Pfft.   But I bought a few that I thought were right, though no metallics in stock yet. I also got Paper Artsy stamp set 'Wings4' as it had a tiny dragonfly in it.

As it turned out I didn't get the right greens, and thought I'd use some perfect pearls bronze mica powder in lieu of the metallic paint. But I'd forgotten how powerful the powder is and that a little goes a VERY long way. Mixed with water to make a very wee puddle, it just about coloured half the tag and so the effect is just a bit overpowering! I've hidden the worst behind the date ticket and rocket square.    And the metallic finish of the tag has a very strange effect on my ink stamping - the ink just fades away.  I'm new to stamping and am a bit confused by all the different types of ink there are so presumably Memento fade resistant Dye Ink in Tuxedo Black is only fade resistant on non metallic finishes!  Who'd have known? Another lesson learned.  If someone can explain the difference between dye inks and solvent ink (I have Stazon)and all the other types inks then I'd love to hear from you...

I'm going to try and incorporate (or hide) a date ticket in every one of the Tags of 2013 marked with the day I made it. I thought that would be nice.


Tuesday 2 April 2013

Let's Play Tag

April at last, the sun is shining, and another tag from Tim Holtz to play with. He used his new metallic acrylic paint dabbers along with other dabblers none of which I own (yet!) so had to make do with what I have in my stash. It's okay but a bit muddy as my colours were not as bright. And instead of a dragonfly I used a silver foil butterfly that my crafty friend Cheryl sent me in a swap. I'm not much of a butterfly person but after a bit of tinkering and dabbing this was perfect. And my friend Elspeth posted a photo on Facebook today of the first butterfly of the season so doubly apt!

Friday 29 March 2013

Life's a Beach - done!

It's been a busy week.  The fire service that I work for, along with the 7 others in Scotland are joining together to become the Scottish Fire & Rescue Service on 1 April 2013.  This is a huge undertaking that will take a few years to settle in, but this week it entailed much hand shaking and hugs goodbye to those who decided to jump ship (whilst the going is good?), planning meetings (where not a lot got done), panic over the lack of properly headed letter paper (okay that was just me)and also a large cake and wine. Much wine. I have had a hangover today.

BUT, hurrah, it's a public holiday!  So I took the dog for a walk to settle the head, made a quick visit to my friendly local scrapbook supply shop (The Mad Scrapper in Longniddry) for supplies, some  I needed and some I didn't (isn't that the way it always goes in a craft shop?), and then settled down to finish the book I started last week.

This is made with Fab Scraps papers, Dusty Attic die cuts that have been inked and embossed, various Tim Holtz elements, and some shells from the beach.  There are other bits and pieces but as I have a habit of chucking away the packaging I'm not sure what make they are (sorry).

The  white fish net I bought online from Calico Crafts and I distressed it with distress inks then dabbed it with Mod Podge mat sealer to stiffen it. This makes it much easier to work with.

Tada! Some of the pages - there are more but my phone refuses to upload!


Sunday 17 March 2013

Life's a Beach

I was going to sit down yesterday afternoon to start a new mini album, but got an unexpected invite to meet friends for coffee. This turned into an four hour coffee and shopping marathon. I was 20 minutes too early to meet up with Sharon and Dot, so decided on a quick butchers in Hobbycraft. That quick look cost me over £20 but I got a few bargains, including some Papermania clock hands and label plates from their Chronology range, for only a quid each.

Coffee drunk, Sharon abducted me and drove us to the Gyle (the other end of the city from where we were) to have a look at some dining chairs in Marks and Spencer's on which she wanted our opinion. Nice chairs, but undecided. However she did get the bargain of the century, surely, as she bought an office table/desk and chair from M&S reduced from £1200 down to £270! Lovely.

Today, I sat down and started my album. This will be made from Fabscraps 'Summer Collection' papers and tags. I managed to do one double sided page but had to take the dog out for a walk mid afternoon, so we went to the beach. Here's the first page: